
The screenshot feature for Windows 10, 11, ... etc. in Desktop OK is an optional feature for desktop screenshots!
The screenshot function can be optionally activated in Desktop-OK, if you want to capture a screenshot of the desktop as a full screen or only a certain area of the Windows desktop as an image. It really does not matter if it's the new Windows 10 or one of Microsoft's older Windows desktop and / or server operating systems.
Info: for Screenshot when used on multiple screens use from version 6.48.1!
1.) ... Activate the screenshot function in desktop OK!
2.) ... Using of the screenshot function!
3.) ... Activate screenshot from System Tray in Windows!
See also: ► DesktopOK Tools + Functions!
1.) Activate the screenshot function in desktop OK!
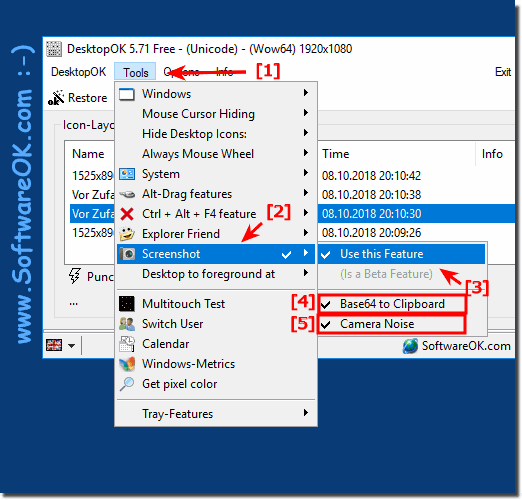
Please start DesktopOK , activate the screenshot function and if you wish you can also start it directly via the info area of the Windows taskbar.1. The activation (... see Image-1 Point 1 to 3)
2. Base64 option (... see Image-1 Point 4)
optional for webmasters and who needs it.
3. Optionally activate camera noise (... see Image-1 Point 5)
| (Image-1) Activate the Screenshot Feature! |
 |
2.) Using of the screenshot function!
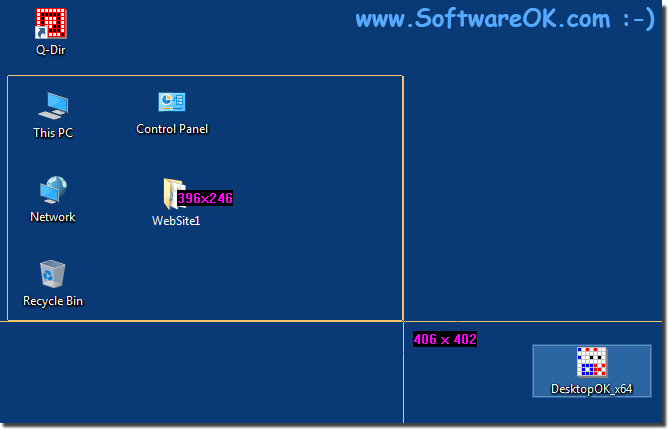
Start to take a screenshot by pressing the [Print] key on the keyboard, or by clicking on the notification area, in the windows task bar on the camera icon.1. Press the left mouse button and keep it down, and then select the area of the screen capture that you want.
2. If you select the area on the screen they will automatically display the size in pixels of the selected area.
(... see Image-2)
3. When you have finished marking, release the left mouse button.
Optionally, before releasing the left mouse button:
a.) By pressing the [S] key to directly save as a file: GIF, TIFF, PNG, BMP, JPG
b.) By pressing the [P] key open the image in MS Paint to edit it.
PS: Optionally, if you do not select anything, a full screen image is taken from the desktop and placed in the clipboard by a simple mouse click at the same location.
| (Image-2) Using of the screenshot function in desktop OK! |
 |
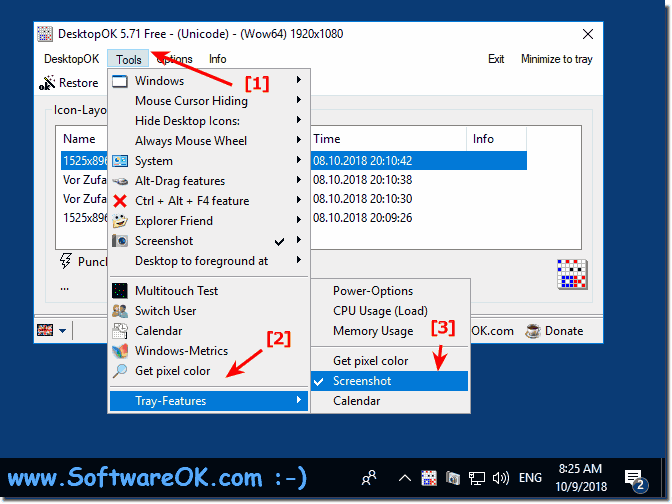
3.) Create Screenshots from System Tray in Windows!
Starting from version 5.71 you can start the screenshot from the notification area of the Windows taskbar, you can start the capturing by a right or left click on the symbol in the taskbar to create or mark the screenshot area.1. Activate the screenshot from the info area Function
3. Click on the icon in the taskbar to create the screenshot.
►► ... back to DesktopOK!
| (Image-3) Screenshot Function from Notification Area! |
 |
Wednesday, October 10, 2018 14:59:52
User bug fix message!
Today, after installing the latest version of DesktopOK, all of our family notebooks have a new icon in the bottom right corner of the systray that says "ScreenShotOK" when you hover over it. After restarting the notebook, this icon has disappeared again.
Given the name and the fact that DesktopOK was previously reinstalled, I suspect that this icon has something to do with DesktopOK.
It would be nice to get a short message on the subject. Thank you in advance and thank you very much for the useful program and your program maintenance.
Bug Fix Screenshot Icon 5.71.1 fixed!
Info:
Old but gold - the classic Windows shortcut to take a screenshot is still the first choice for many today and also works in Windows 10: the "Print button". It is usually found above the "Insert key". If you press the button once, you take a screenshot of the entire screen area and save the result at the location mentioned for further processing. The FN key may be necessary for laptops. DesktopOK offers more editing options than Microsoft's screenshot tool. Download the freeware here. The advantage of this method is that it is quick to use, the relatively clear key designation does the rest. However, screenshots made in this way may make further work necessary, since they represent the entire active screen including any desktop extension. For smaller image sections - in presentations, for example - there is no way around short editing.
Old but gold - the classic Windows shortcut to take a screenshot is still the first choice for many today and also works in Windows 10: the "Print button". It is usually found above the "Insert key". If you press the button once, you take a screenshot of the entire screen area and save the result at the location mentioned for further processing. The FN key may be necessary for laptops. DesktopOK offers more editing options than Microsoft's screenshot tool. Download the freeware here. The advantage of this method is that it is quick to use, the relatively clear key designation does the rest. However, screenshots made in this way may make further work necessary, since they represent the entire active screen including any desktop extension. For smaller image sections - in presentations, for example - there is no way around short editing.